Showing posts with label diy. Show all posts

Monday, December 10, 2012

It's beginning to look a lot like Christmas...at the G house!!

I love decorating the house this time of year. Going to storage and sifting through years' worth of ornaments, wreaths, pillows, etc. makes me all happy inside as I reminisce on years' past. The house always seems warmer and cozier to me this time of year. There's nothing like coming home after a long day, it's dark outside and only 4pm, and seeing the Christmas Tree all lit up. 
To me, it really is the most wonderful time of the year!


Happy decorating!!

Monday, October 8, 2012

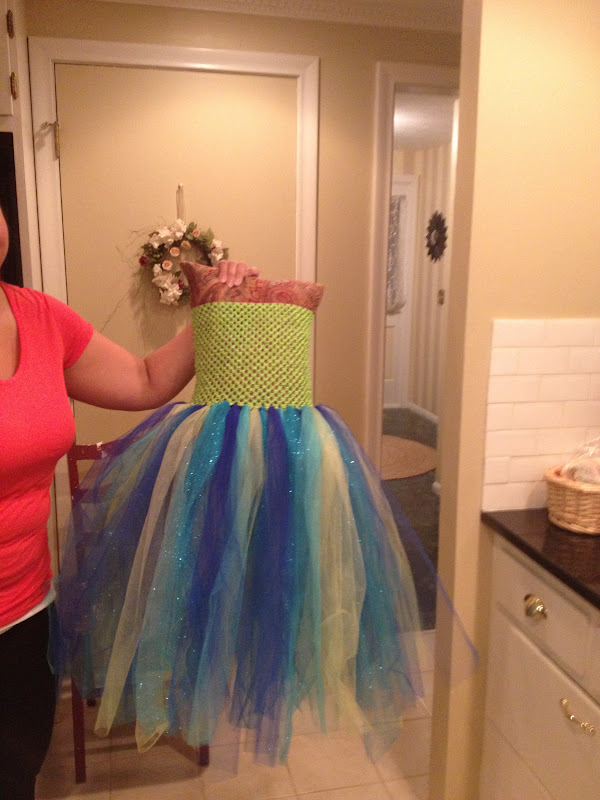
Tutu Time!

This past weekend, I helped my BFF and bride-to-be, Madison with some wedding duties! She had a pinterest-inspired idea to make the flower girl dresses, and as freaked out as I was originally (trust me, I'm no Martha!), it was actually pretty easy! And they came out SO super cute! 

Pink champagne + tutu time = success! 


Can't wait for more wedding crafts!!

Tuesday, July 31, 2012

Gallery Wall

So.... in keeping with the theme of home improvement projects I've been on lately, this past weekend, I decided to tackle the space above the couch. It has been bare since we moved in-about 5 months ago-but it's just such a large space that I couldn't commit to putting something there. I debated finding a great piece of art, a mirror or some large photographs, but in the end, nothing 'spoke' to me. 

That is until I was perusing my favorite (addictive) website pinterest! I ended up pinning a bunch of great gallery walls that people had in various places around their homes. I thought this was something I could tackle, so I headed off to Target to get some great frames-I did a mix of black and white-and printed out some of my favorite photos. I wanted a mix of family, places we loved, our pup, and of course, some of us as a couple.


Okay-living room gallery wall-check!
Onto the next :)

Monday, July 23, 2012

master bedroom update

This past weekend, our master bedroom got a major update! Thanks to my in-laws who bought us new sheets for our 2nd anniversary-apparently it's the "cotton anniversary" so it was very apropo!

Here are some of the before's...please don't judge-I just took pics without tidying it up :)


And here are the after's! I was inspired by the gray sheets, and picked up some soft gray curtains via target, a new duvet cover via west elm and I added a pop of color with a green blanket I had via west elm and a green arm chair (thrifted) for a reading nook...I think it's quite an improvement!


I absolutely LOVE my new reading nook! Since it's our only bedroom, if I wanted to watch TV, I had to sit on the bed...which wasn't always enjoyable.  Now I have this sweet little nook to read, relax and watch my shows :) It's only a start, I'm planning to add a gallery wall above the bed, and some other pops of color to the walls!

I'll keep you posted :)

Thursday, April 26, 2012

Gettin' Crafty


I am SUCH a pinterest junkie, and lately I've been getting so inspired by the things I'm 'pinning'. I have never been the 'craftiest' girl, Martha Stewart, I am not...but some of the projects out there just look so easy, that I convinced myself to try them out!

The first was a pretty basic DIY chalkboard. I took two items that I really had no use for anymore and turned them into chalkboards.  One is a corkboard that I've had since I was like 12, (and yes I did have to use extra primer to paint over all the teenybopper musings, i.e. "I heart Dan" and "Erin +Liz=BFF!" LOL). The other was a mirror with a really cool frame-the mirror broke, but I kept the frame, because I just loved it and knew I would find something useful for it!

 2 coats of primer each!

2 coats of chalkboard paint, and they were ready to go!

After my successes with the chalkboards, I built up the courage to try making over two pillows with some fabric that I picked up. 

Materials: pillows, fabric, scissors, hem tape, iron

covering the pillows with fabric before I make the cut "measure twice, cut once"

Making the cuts, of course Gertie had to get in on the action!

She just had to see what I was doing :)


break for doggie kisses :)

and cuddles :)
back to work...
determine where you want hem, then find something semi-heavy to hold it down

I attempted to match up the hem...

clearly Gertie wanted to help

Hi Mom!

Iron the hem down-about 90 seconds applying pressure

voila! one pillow down...

I got this ma!
what?...I'm helping...

I used the fold of the fabric for the back, and hem tape for each side...then I decided to go with a velcro enclosure for the final side, so that I could mix it up with a different pillow cover if I ever wanted to...

A shot of the velcro...use the same method as hem tape. Iron for 90 seconds applying pressure (iron on the fabric side, not touching the actual velcro side)


and ta-da! all done!


So that marks my first adventure into the world of DIY crafting :) Up next, I think I'm going to attempt DIY roman shades found here or here ...eek!